This version of ChordEdit adds another new feature. It uses music theory to "discover" virtually all the chords that are musically and physically possible. This can be done for any fretted, stringed instrument.
The new "Chords Browsing" window allows you to browse this library of possible chords and build your own personally library from them. It also allows you to "draw" fingerings on a virtual 'neck' and discover what chords you have made.
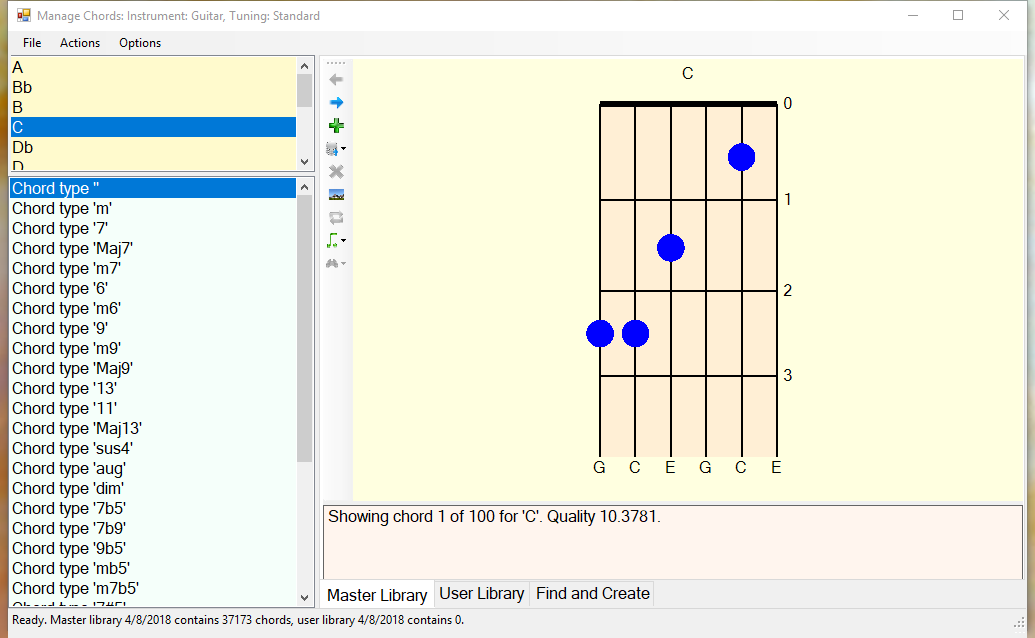
The image below shows the Browse Chords window.
On the left, there are two lists The upper one contains all the musical notes; the lower one has all the currently defined musical chord types. Normally you would select a note and a chord type, then the relevant chords appear on the right.
On the right, there is a tabbed pane with three tabs:
At the left border of the right-hand pane is a vertical toolbar. You can hover your mouse pointer over these buttons to see what they do.
At the bottom of the pane is descriptive information about the contents of the library or the chord you are drawing. The toolbar allows you to move through a collection of chords one at a time.
The chord discovery process that ChordEdit uses assigns a numerical "quality" value to each chord it discovers. This number is just a coarse estimate of the musical quality and physical playability of the chord. The best possible quality is zero (higher numbers are poorer quality).
Each chord in the "Master" library has a quality. You can sort the chords in the Master iibrary based on quality.
Although some common chords sound all the strings, most "real" chords rely on the player "muting" or deadening certain strings to avoid unwanted tones.
ChordEdit's chord disovery routine checks each note and chord type combination for possible chords, first using all six strings open, then any five strings, then any four strings, and, finally, any three strings (i.e. with three dead strings).
When you view a chord, be sure to read the note names at the bottom of the chord to see which strings are dead: they will be indicated by an 'X".
An "instrument'" in ChordEdit is a fretted, stringed instrument with a minimum of three and a maximum of eight strings. The standard six-string guitar in "standard" tuning is one of the built-in instruments and is active by default.
To see the instruments available, choose "Instruments..." from the View menu.
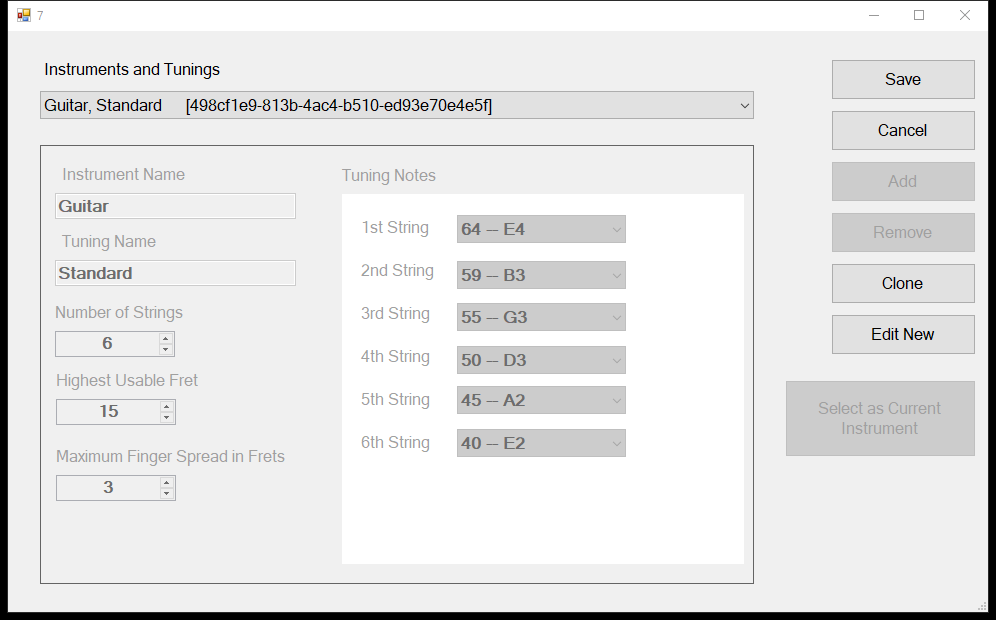
Each instrument has an associated set of characteristics, including:
You can browse the instruments available, select a different instrument or tuning or create your own.
The drop-down list starts with the application's current instrument as the selection. You can browse the settings for all the current instruments.
The long string in parentheses is a unique identifier for that instrument. It is also used to segregate all information about an instrument into a separate sub-folder in the ChordEdit configuration folder.
You can add and delete instruments, but you cannot alter one. To do this, clone it, change the clone and delete the original.
The control buttons are:
For every instrument you define, there are two files on your hard drive that contain the chord library data. Under the ChordEdit configuration folder in your Documents folder there will be a sub-folder for each instrument you have used. Under that folder, there is a Library folder containing the Master and User libraries (see below). There is also a Frames folder containing any chords frame images you may have saved for that instrument.
These libraries take a few minutes to create (see bel0w). The first time you try to browse the chords for an instrument, the Master library will be created, along with an empty User library.
The "Master" library is a large database of thousands of possible chords deduced by ChordEdit's chordal discovery routines. It is built the first time you browse chords for an instrument. (See "Recreating the Instrument Master Chord Library" below.)
You select a chord to investigate by selecting a root note and a chord type from the left-hand lists. The "Master Library" tab will then show you all the associated chords, in order by quality.
The Master library does not normally change. It is a resource you may use to build your own library of chords and to create chord frame images for your songs.
The "User" library is a database of chords that you maintain. It is initially empty. You add chords to it from the Master library or create your own chords and add them.
When you select the "User LIbrary" tab at the bottom of the pane, you will see the first of the set of chords (if any) related to the root note and chord type selected at left.
The User library changes when you add chords to it or delete chords from it. When viewing chords from the Master database, use the toolbar to add them to the User database. Similarly, when you create a new chord using the "Create and Find" tab, you can add the result to the user library.
When you close the Browse Chord window and the user library has changed, you'll be asked whether you want to save the user library.
The Toolbar allows you to sort the chords of the master or user libraries for a particular note name and chord type. There are two sort orderings.
The third tab in the right-hand pane is labeled "Find and Create". It allows you to "draw" a chord and analyze it musically or find its match in the Master library.
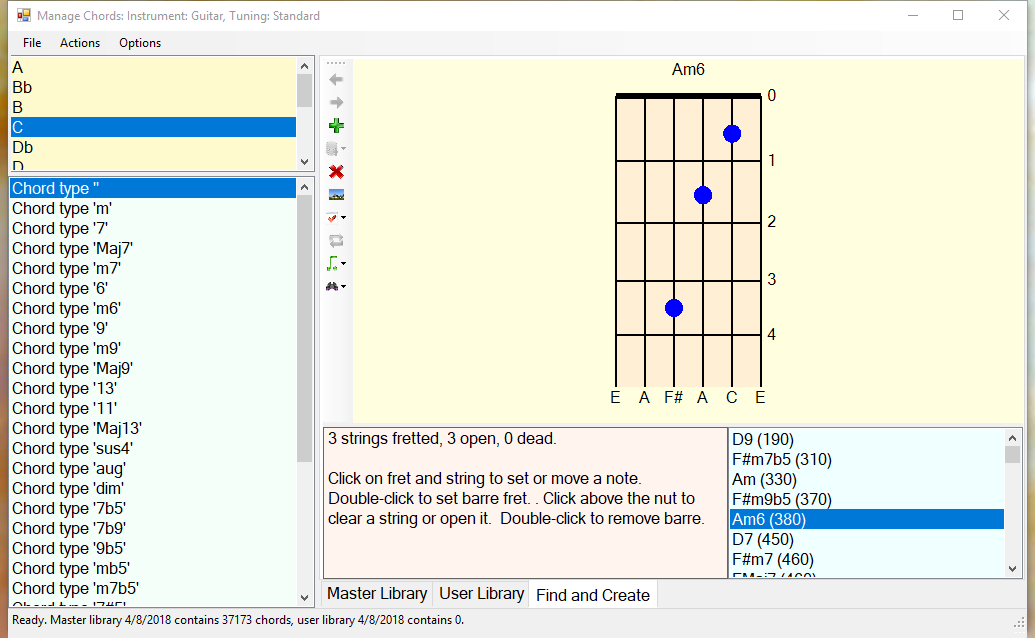
This is the only pane where the chord image can be changed. In the other panes, the chord is use to display the contents of a library.
In this pane you use the chord image to interactively specifiy a chord. The details are described below.
When you enter three or more distinct notes, the list of chord names in the lower right-hand corner will contain possible names. Each name, such as "Am", will have a number next to it. This number represents the likelihood of the chord you entered being a good match: lower numbers are better, so zero would be perfect.
Remember that in music theory, three notes are the minimum required to make a chord (duplicates count only once). After you have specified three notes, the list in the lower right-hand corner of the pane will be filled with possible chord names and types based on the notes you've entered.
Once the chord type is set, you can search for an exact match in either the master or user library. The results will be sorted according to the current sorting order.
Note: You will only get the results for the specific root note and chord type you selected. If you wish to find other possible uses of the same fingering, choose a different chord name in the lower right-hand chord name list.
Each of the three panes has a vertical toolbar to its left. Most of its buttons are available only at certain times.
Here are the toolbar button functions:
Back: move to the previous chord in the collection.
Forward: move to the next chord in the collection.
Add: add the chord to the user library (applies to "Master Library" and "Find and Create" tabs).
Delete: delete the chord from the user library or clear 'fingers' from the created chord.
Sort: For the Master or User libraries, choose your default sorting sequence for each particular root note and chord type.
Create Image: Take a snapshot of the current image and open the "New Frames" dialog to add a new chord frame image to your Frames library.
Restart: Move to the first chord in the current collection.
Auto-Fret: enable or disable "Auto-Fret" (see below; applies only to Create/Find).
Chromatic Naming: Choose the sharp or flat version of the name (applies only to Create/Find).
Find: locate the chord specified in the Master library (applies only to Create/Find).
Clone: in the Master or User library pane, this button loads a copy of the current chord into the interactive chord on the Create/Find pane.
The chord image in the "Find and Create" tab is interactve; that is, you may click on it to change it.
To add a 'finger', click on a string above the intended fret.
To remove a finger, click on the finger itself.
Strings are initially considered "dead", and are marked with an 'X' at the bottom of the image. To 'open' a string, click above the desired string.
To 'deaden' a string, click above an open string.
To add a 'barre' finger, double-click on a fret. To remove the barre, double-click above the nut (top fret).
Normally, the size of the chord frame is automatically adjusted based on the notes required. This is called "Auto-Fret".
However, when creating chords you may need to move higher on the neck or spread a chord wider than normal. To do this, use the toolbar to turn Auto-Fret off.
When Auto-Fret is off, two sliders will appear next to the toolbar. The upper slider controls the starting fret for the chord diagram, the lower one controls the number of frets shown.
Once you have entered three or more distinct notes (either with fingers or open strings), the list in the lower right-hand corner will fill with the probably musical name for the chord. Note that a minimum of three musically different notes are required to determine a chord type. Duplicated notes only count once.
You can choose any of the chord names that appear in the chord list; just select it with the mouse.
Now use the "Add" button (plus sign) on the toolbar to add the chord to the user library.
Once you have three notes and possible chord names appear in the chord name list, you can search the Master database for its exact match.

The Master library is created the first time you need it for any particular "instrument" (i.e., instrument and tuning).
This feature can be re-run at any time. Under the "Options" menu in the Chord Browsing Window, click on the item "Recreate Master Library". Activating this item will rebuild the Master library.
The window above will appear. You can choose the maximum number of each type of chord to save (root note and musical type) and how much of your computer's processing power to dedicate to the work.
In general, the chord discovery routine discards chords that are the same as other discovered chords of the same type but with more dead strings. If you want to see all the possible chords, un-check the "Prune similar" checkbox (a much larger database will result).
Checking the "Close when finished" checkbox causes the dialog to return automatically to the browsing window when the task is complete.
You will typically do this once for each instrument you use, either built-in or defined by you.
If you add new musical "Chord Types", you may want to recreate the library to incorporate chords discovered that match your new chord type. If you change the chord types without rebuilding the libraries you will get a warning.
Discovering all possible chords requires a bit of mathematcial analysis. The window shown below is available from the Options menu of the Chord Library window.
This dialog is only available if you edit ChordEdit's "Settings.xml" file to enable advanced features.
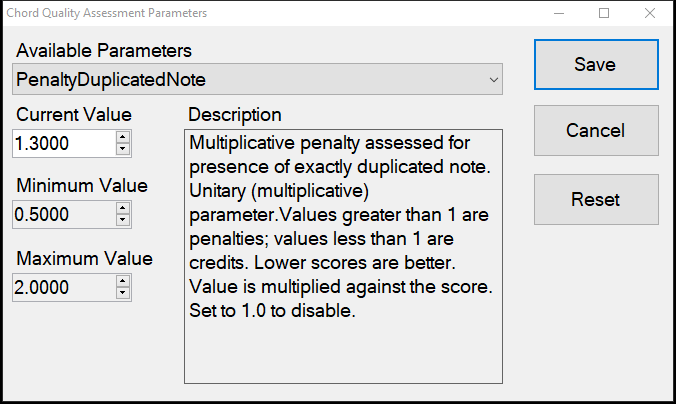
This dialog lets you view and alter the many parameters involved in analyzing fretted chords. The exact algorithm is difficult to document, but many of its characteristics can be deduced from reading the text descriptions provided.
If, after you change any values, the results are not working, use the Reset button to restore things to their original values.